Instruction for Deconvolution
1. How to take your stacks
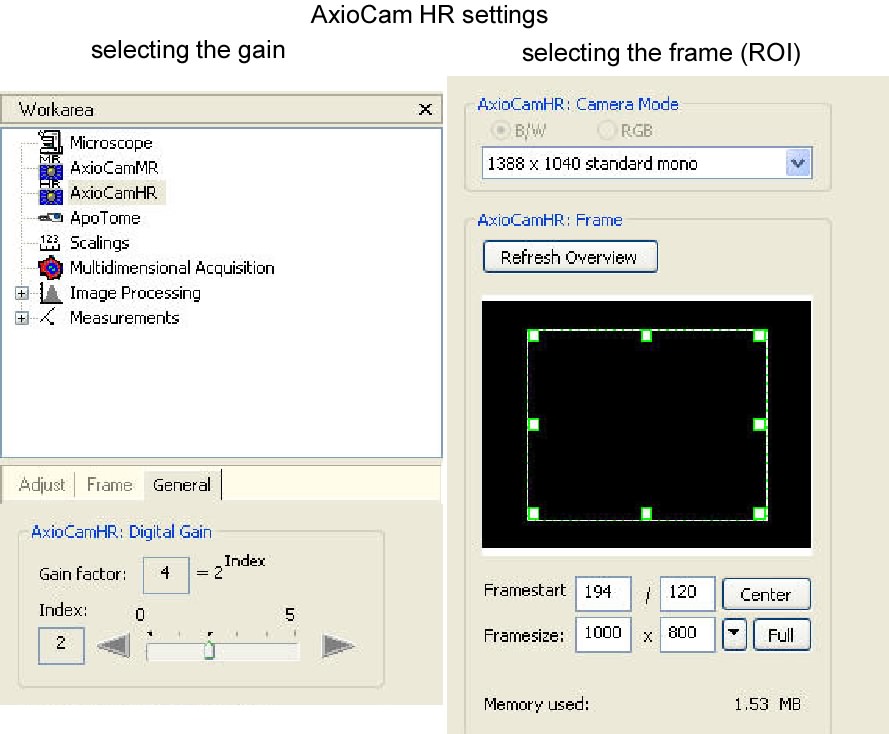
Reduce the amount of data by selection a region of interest
that you are capturing. You also might want to check the gain of the camera to
reduce exposure time. The higher the gain, the shorter the exposure, but the
more noisy the picture will be.
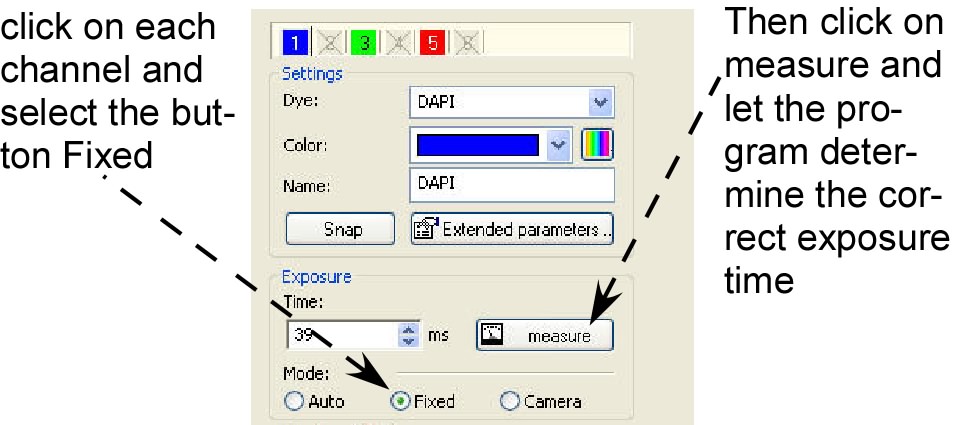
2. Exposure Settings:
Deconvolution can only work when a constant exposure is used
throughout the stack. Select a z-position where you have a high signal and then
measure the correct exposure with a fixed exposure mode
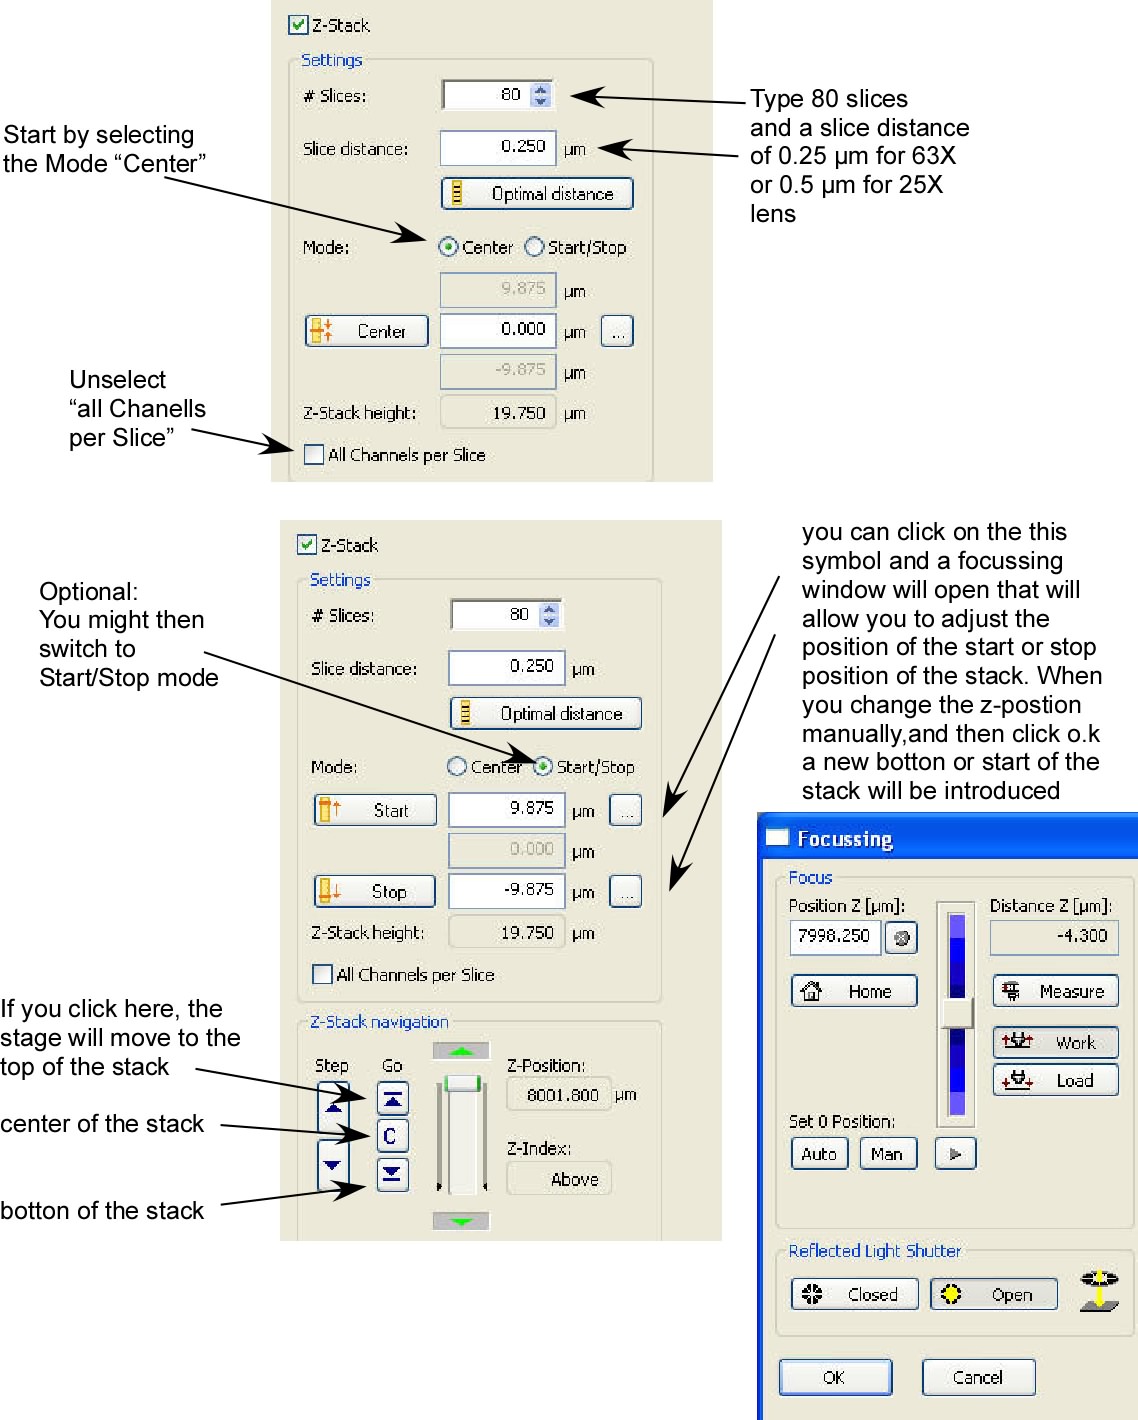
3. Z-stack setup
4. Taking and saving your
picture
Go back to the main window and select START. This will start
capturing your z-stack. Be patient, this can take some time.
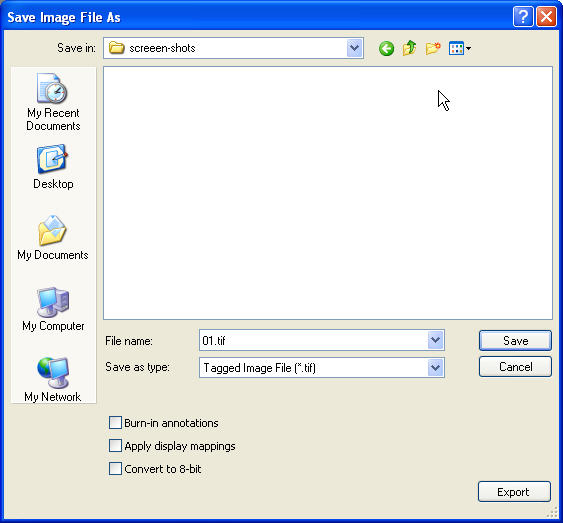
When done, save you stack as a sequence of TIF files by
selecting:
Save
And then select as type Tagged Image File.
Make sure to unselect
the three buttons at the button, most important the convert to 8 bit and Apply
display mappings.
Naming your file: If you want to use the macro that creates tif files, you have to name your stacks in the following way:
01.tif, 02.tif 03.tif etc.
In addition, the macro only accepts up to 9 stacks in a folder, if you have more, save them in a new folder
If you need a more descriptive way, just name the folder
that you save it in
Then hit save.
5. Create stacked TIFs and transfer to the server
Make sure that the server Jakob is mounted, if not, mount Jakob from the "Network-favorites" folder
Go to the desktop where you will see a txt file named:
makestack_to_jakob.txt
drop this file onto the ImageJ icon. This will
create stacked TIF files and will transfer them onto the Jakob server
in the directory "stacks-transferred"
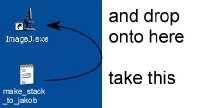
The "
makestack_to_jakob.txt" file is an ImageJ macro. The code is here.
6. Rename, transfer to Batch folder and prepare Batch queue
If you want, rename your files now.
Then go to a Mac computer and open the Application "Terminal"
Log onto the Jakob server (134.95.180.203)
Navigate to the "stacks-transferred" folder (with the UNIX command cd)
Then type "ls -1"
This will give a list of your file names in a single column format
Copy this list into a new Word file
Then transfer all of these files into the folder "Batch" using either
UNIX commands (mv) or by drag and drop using the SAMBA connection from
the Mac to the Jakob server.
The list of files in the Word document: Make sure that the document
starts with at least one empty line. Then run the Macro "batchimager"
from the Macro menu in word. This will add all the necessary
informations to the file names. If the macro does not exist, create it
using these commands.
The word file will change this: to something like that:

Using the direct SAMBA connection from the Mac to the Jakob server,
navigate to the "Batch" folder, then open the file "batchCtl.tcl" using
the program "SubEthaEdit"
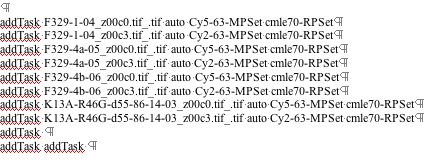
navigate to the end of the file and replace all "addTask" line with your newly generated tasks.
Save and close the "batchCtl.tcl" file
7. Start and run the Batch queue
Setup an connection to the "juri" Server (134.95.180.200)
navigate to the "Batch" folder
type
./doBatch.tcl
This will start your job
All results will be placed into the folder
Batch/Results/Results
leave the connection window open, otherwise the job might get cancelled
8. Postprocessing
I have written a short macro that will combine two sections into one
using a maximal projection and then will enhance the contrast of each
section to achieve 0.1 % saturated pixels, In addition, the data will
be downscaled to 8 bit. This is the code
To execute this macro, you have to logon the juri server via an X-Terminal:
Open the X11 application on the Mac, then type:
xhost +
After that logon and set you computer as the display computer, navigate to te ImageJ folder then type ./run
Here is an example session:
leptin-frank:~ frank$ xhost +
access control disabled, clients can connect from any host
leptin-frank:~ frank$ ssh -x fspreng@134.95.180.200
Password:
Last login: Wed May 24 17:05:47 2006 from leptin-frank.genetik.uni-koeln.de
fspreng@juan:~> export DISPLAY=134.95.179.213:0.0
fspreng@juan:~> cd ImageJ
fspreng@juan:~/ImageJ> ./run
You should then get an ImageJ Window. From this window, select Plugins-Macro-Run
The Macro is stored in the this folder: /Batch/Results-process/ij-rslic_grouMax2_8bit.txt
The output is a stacked tif file that you can transfer to your local computer for further processing using ImageJ locally.