Printing a DIN A0 Poster
1. Printer driver
Windows XP has Driver for HP Designjet 750C/PS in the
Printer list.
If it does not appear, you have to install this printer (control
panel, add printer, select local port and send to file, the find in the list
the HP Designjet printer).
2. Programs to assemble Poster and setup
page size
Canvas and Powerpoint work. Select custom paper size and as units
points, then enter for the paper size 2514 for width and 3431 for height for
portrait and the other way around for landscape.
Be careful, the uppermost part of the document might get truncated
a little bit (check with ghostview; see below)
3. Assemble document
If you put together
the poster, very large files can result. Usually, a Canvas file with abot 100
MB size is o.k., but to avoid problems, you could check the resolution of your
pictures and change them to a 300 dpi. To do so, click on a single picture (not
a group of images or images grouped with text). Then go to
“Image-Area-Resolution”. In the upcoming window the resolution will be
displayed.
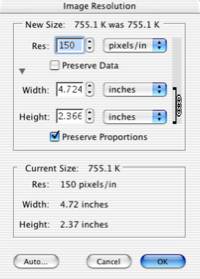
In the filed Res, type in the desired resolution
Another problem can be special characters. Use the Symbol font
when entering special characters and not special keys within the font you are
using. Check these special characters later using Ghostview.
4. Print
Postscript file
Transfer
your document onto a PC (e.g. rux-Computer)
Open
document, select page setup and then HPDesignjet 750C/PS printer.
Check
the boxes: Fit to Paper, Center on Paper,
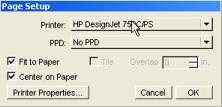
Click
on Printer Properties
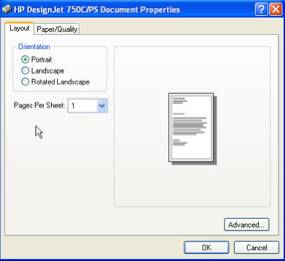
select
under Layout, Portrait or Landscape, whatever you need, then click on
Paper/Quality
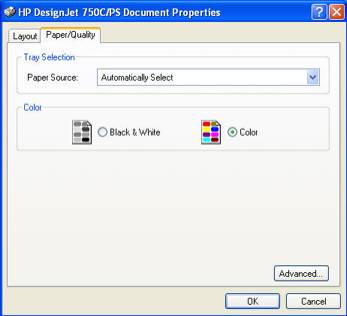
then
click on Advanced
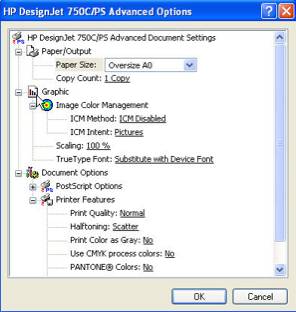
As
paper size select Oversize A0
Click
Ok
Under
document setup in Canvas select document size from Printer
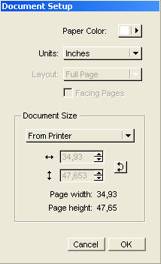
Make
sure your document is well within the borders that the Canvas layout now
displays.
Then
click print. Make sure that Color Mode is RGB and that you click on “Print to
file”
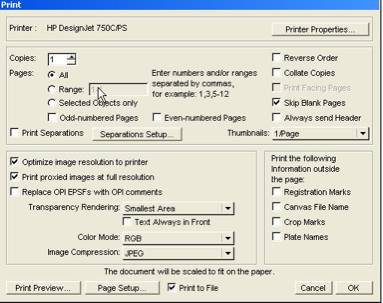
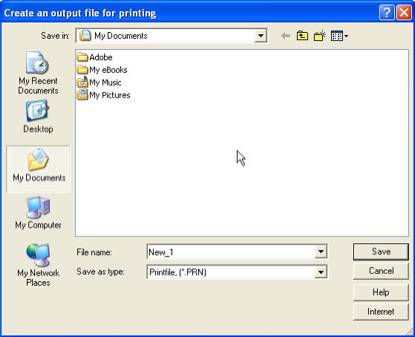
You
can now save your file (as a .PRN file).
5. Check
your Postscript file with Ghostview
You
need Ghostscript and Ghostview to do this.
Ghostview
and Ghostscript can be downloaded here:
http://www.cs.wisc.edu/~ghost/doc/mirror.htm
Open
the Ghostview program (under Ghostgum-Ghostview) and open your PRN file. Adjust
the size being displayed under -Media- and select “user defined. Then add 2514
for width and 3431 for height for a portrait oversize A0 poster. You also might
need to adjust the magnification to see your whole poster.
6. Transfer
to campfire computer with an SFTP program
On
the PC, you can use the program WINSCP (http://winscp.net/eng/index.php)
On
the Mac, use Fetch (Version 5 is SFTP)
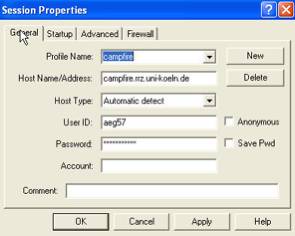
Connect
in the SFTP program to campfire:
campfire.rrz.uni-koeln.de
UserID:
Your ID, eg. aeg85
Password:
your passoword
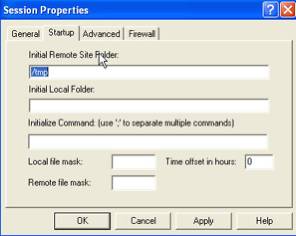
Set
the initial directory to /tmp
(these
windows are from the old program that was not SFTP capable. I will update this
file soon with new screenshots)
In
the Startup menu, enter as initial remote site /tmp
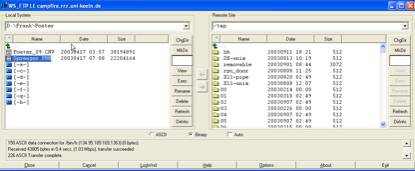
After
connecting to campfire, navigate in the right window to your folder that
contains the PRN file
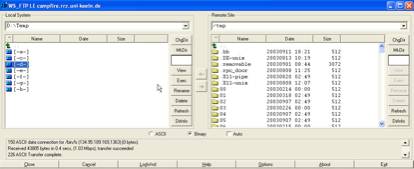
Click
on te arrow to the right to start the transfer protocol. To make sure that the
file was delivered intact, reload it from the campfire computer to your local
computer (to a different folder in order to avoid overwriting). Then check this
file with ghostview for mistakes.
7. Send the file into the print que of the
printer
On the PC, you can use the program PUTTY (http://www.chiark.greenend.org.uk/~sgtatham/putty/download.html)
to establish a secure shell connection to campfire. On the Mac use the program
Terminal.
Connect
to
campfire.rrz.uni-koeln.de
On
the Mac type in the Terminal window:
ssh
aegxx@campfire.rrz.uni-koeln.de
where
aegxx is your account number, aeg58
On
the pc type in the connect to server field:
campfire.rrz.uni-koeln.de
and
the account name and password in the appropriate fields.
Send
the file to the print queue
type
lpr -Pdjprobe location (for
a testprint)
!!space after lpr and before location!!
lpr -Pdjglanz location (for
glossy print)
example:
lpr -Pdjglanz /tmp/Sprenger.PRN
(!!
Make sure to have the correct caps!!)
With the command
lpq –Pdjprobe
Or
lpq –Pdjglanz
you can check how many print jobs are in the queue
8. Tell the Rechenzentrum that you would
like your poster to be printed.
Call 4562 and tell them your account number and the name and
location of the file to be printed.
Before picking up your poster, you have to buy coupons that are
then handed to the person that will print the poster.